The idea of this post grew from a conversation we had with my colleagues. We were talking about Microsoft Power Automate, and one of the questions raised during the discussion was if it is possible to setup a flow that can send data to multiple companies.
Indeed, API endpoints in Business central are specific for each company, and we need to define the company reference when we setup a Power Automate flow. This can become an issue when a database has a large number of companies, and each of them must be called. The highest number of companies in one database I had to deal with is above 80, and it scares me to even imagine managing all the flows for various entities multiplied by 80. So I started looking for a way to reduce the number of flows and setup one that can cover all companies. Maybe the solution that I found is not the best one, and it feels like Azure Functions would be a better way to handle authorization flows, but it was an interesting experiment, and I found it worth sharing.
The task that I chose for this exercise is quite simple: synchronize products in Dynamics 365 Customer Engagement with items in Business Central. When a product record is inserted in the CE product table, I want to copy this record into all companies in a BC instance in a single flow.
In theory, all I need for this task is get the list of companies from BC, send it to the Apply to each Power Automate control and call the Items API inside the control. But there are a few difficulties on the way of transforming the theory into practice. The first difficulty is getting the list of companies from a BC instance. BC suite of Power Automate actions does not offer an action to list companies, so I had to construct one. Thus, an article initially dedicated to calling a BC API in a loop for a set of companies changed the focus to addressing the difficulties of the OAuth2 flow without the help from the BC connector.
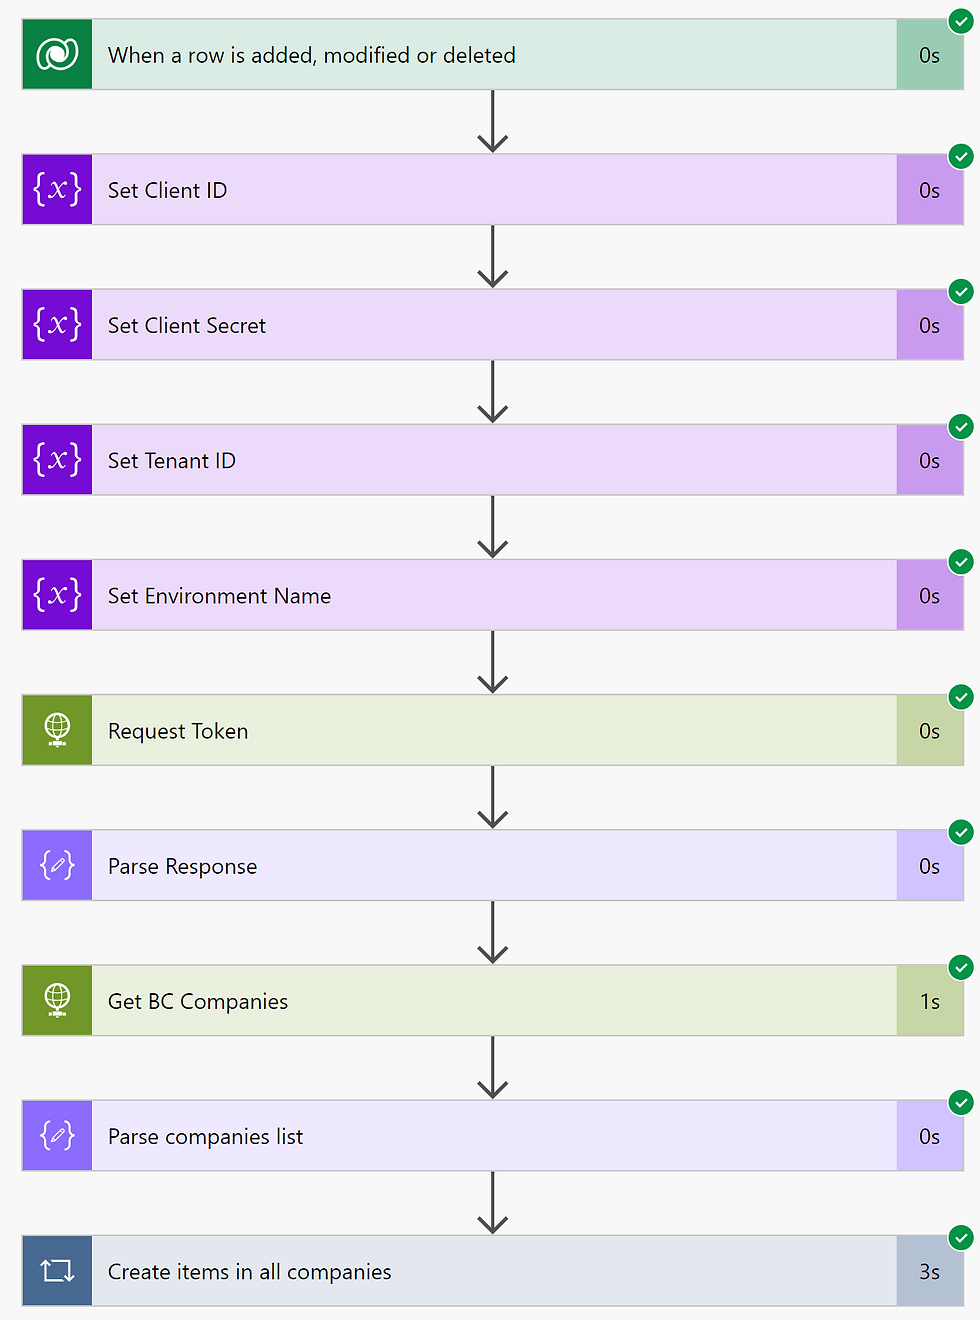
Here is an overview of the whole process that I came up with, from the trigger to creating items in Business Central companies.
Registering the Azure AD application
Before delving into the flow configuration, we need to do some preparation work and register the application on the Azure portal and in the BC instance. Since the Power Automate process will be triggered automatically without user intervention, we should use the Client Credentials OAuth 2.0 grant type, an authorization flow supporting service to service authentication.
The choice of the grant type is described in various source. For example, a good description can be found here:
I will not be overloading this post with the application registration details, since it is explained in detail by other authors, and Microsoft documentation gives a detailed walkthrough of the configuration:
Now the preparation work is done and we can start configuring the flow.
Enabling the Dataverse trigger
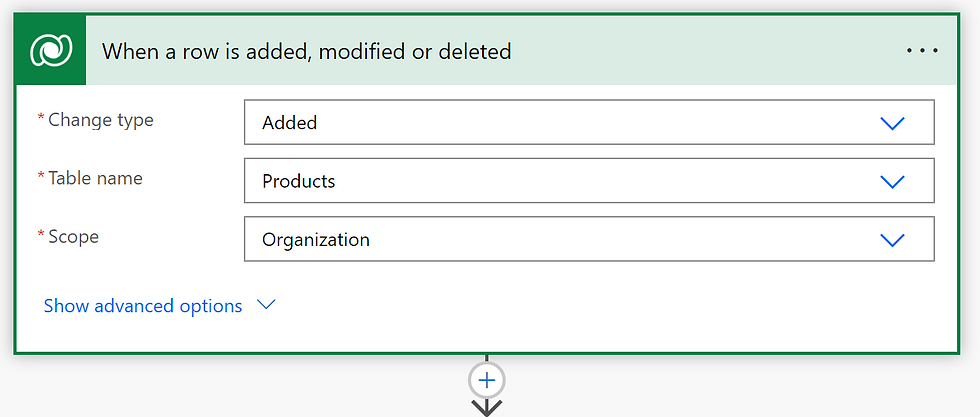
The flow must have a trigger to invoke the process, and this one is quite simple - I want the flow to start when a record is added to the Products table in the Organization scope.
Initializing variables
HTTP requests sent by the flow will need a few parameters. Client ID, client secret, and tenant ID are required for the OAuth2 flow, and the environment name is a part of the Business Central API URI. In this step, I use the Initialize Variable action to assign variables that will be used further in the flow.
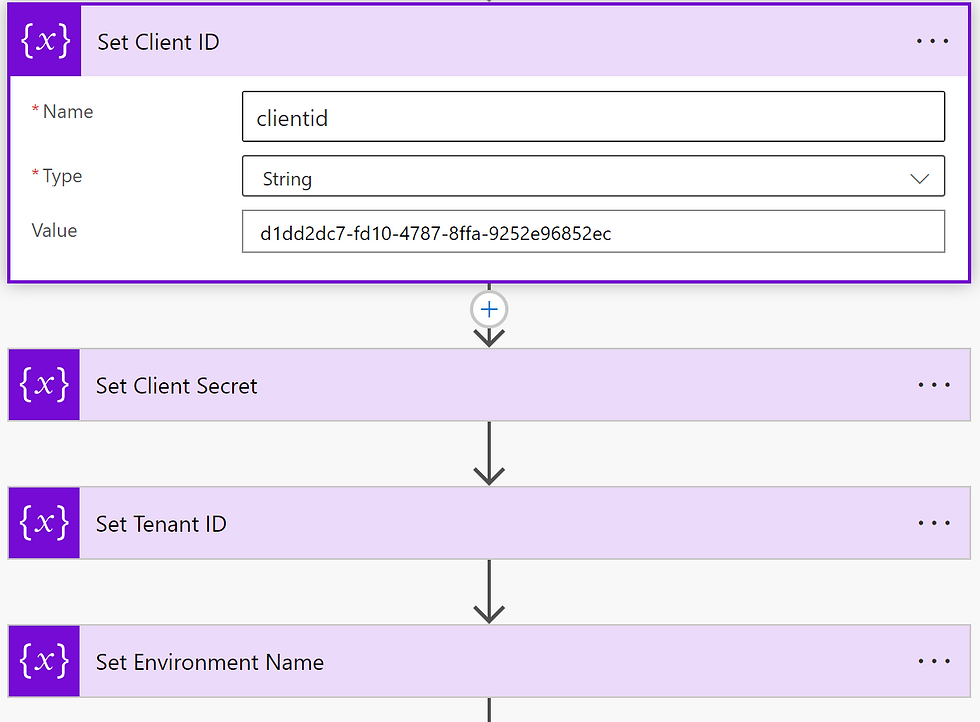
All variables are of type String. Client ID and Client Secret are the values generated during the application registration in Azure Active Directory.
Requesting the access token
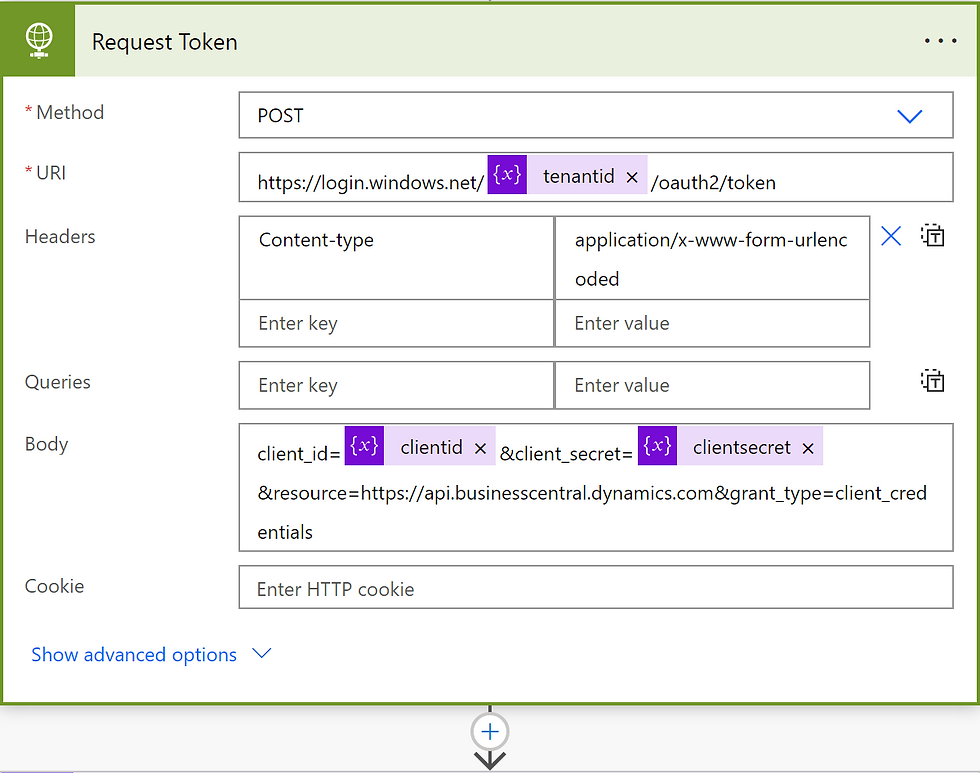
Add the HTTP Request action. This action will be the one sending the authorization request and receiving the OAuth2 token. Request should be directed to one of the Microsoft authorization endpoints and contain the tenant ID, the client ID, and the client secret. It must also specify the type of the authorization flow, which is Client Credentials in this scenario.
In my example, I use the following configuration:
Request body: client_id={clientid}&client_secret={clientsecret}&resource=https://api/businesscentral.dynamics.com&grant_type=client_credentials
Parameters in curly brackets must be replaced with respective variables' values.
Parsing the authorization response
The authorization server sends back the token as a JSON object, and the next step must parse the response to extract the token. In the next flow step, add the Parse JSON action.
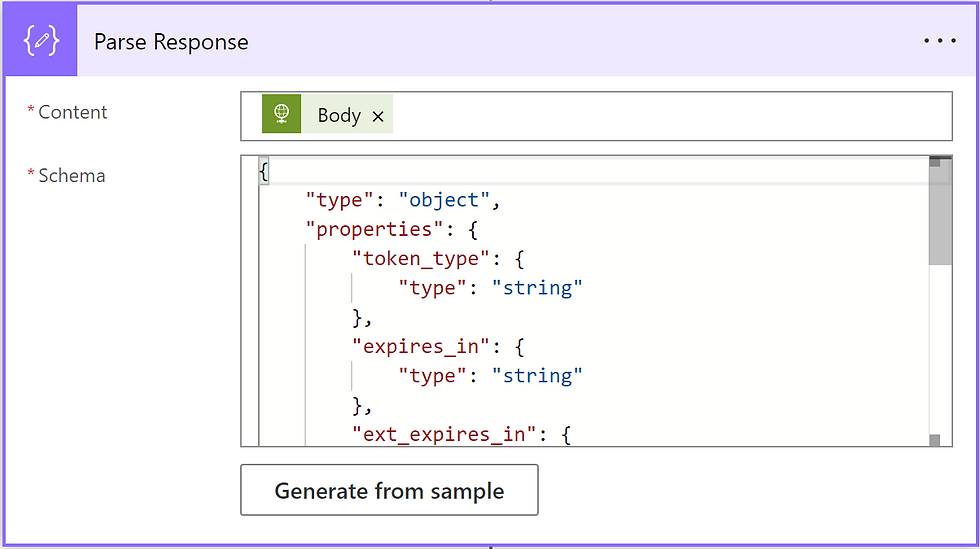
Parser accepts the content of the HTTP response received in the previous step, Request Token. This content is available in the Body property. You also need to provide the JSON schema of the message content to the parser action.
{
    "type": "object",
    "properties": {
        "token_type": {
            "type": "string"
        },
        "expires_in": {
            "type": "string"
        },
        "ext_expires_in": {
            "type": "string"
        },
        "expires_on": {
            "type": "string"
        },
        "not_before": {
            "type": "string"
        },
        "resource": {
            "type": "string"
        },
        "access_token": {
            "type": "string"
        }
    }
}
Calling the Companies API
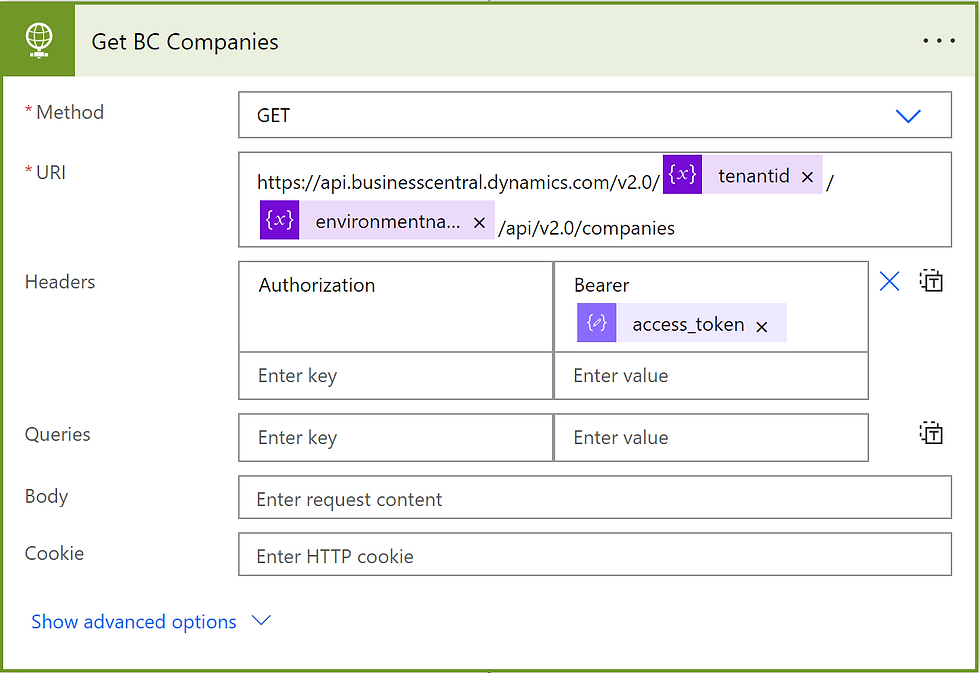
The token is ready, now we can use it to call the Companies API and get the list of companies from BC. This request must be sent on the endpoint.
The tenant ID and the environment name are values of the variables assigned earlier. I'm using API 2.0, so simply set the version to v2.0 in the URL, although this value can be assigned to another variable.
Note the way the authorization token is passed to the HTTP request. We must include the Authorization header in the message and specify the type of the authentication scheme Bearer followed by a whitespace and add the authorization token.
Parsing the companies list
If the request is successful, the BC server sends back the list of companies in a JSON object which must be parsed to extract the names, so the next action in the flow is another Parse JSON operation.

Just like the previous parser, this one takes the body of the response received by the HTTP Request action as input, and applies the JSON schema provided in the settings to extract values. Actually, the Parse JSON action is very helpful and suggests to generate the schema from a message content (that Generate from sample button under the text editor). I used Postman to retrieve the companies list from BC and fed the JSON response to the parser to generate this schema, which is given below.
{
    "type": "object",
    "properties": {
        "@@odata.context": {
            "type": "string"
        },
        "value": {
            "type": "array",
            "items": {
                "type": "object",
                "properties": {
                    "id": {
                        "type": "string"
                    },
                    "systemVersion": {
                        "type": "string"
                    },
                    "name": {
                        "type": "string"
                    },
                    "displayName": {
                        "type": "string"
                    },
                    "businessProfileId": {
                        "type": "string"
                    },
                    "systemCreatedAt": {
                        "type": "string"
                    },
                    "systemCreatedBy": {
                        "type": "string"
                    },
                    "systemModifiedAt": {
                        "type": "string"
                    },
                    "systemModifiedBy": {
                        "type": "string"
                    }
                },
                "required": [
                    "id",
                    "systemVersion",
                    "name",
                    "displayName",
                    "businessProfileId",
                    "systemCreatedAt",
                    "systemCreatedBy",
                    "systemModifiedAt",
                    "systemModifiedBy"
                ]
            }
        }
    }
}
Repeating actions for all array items
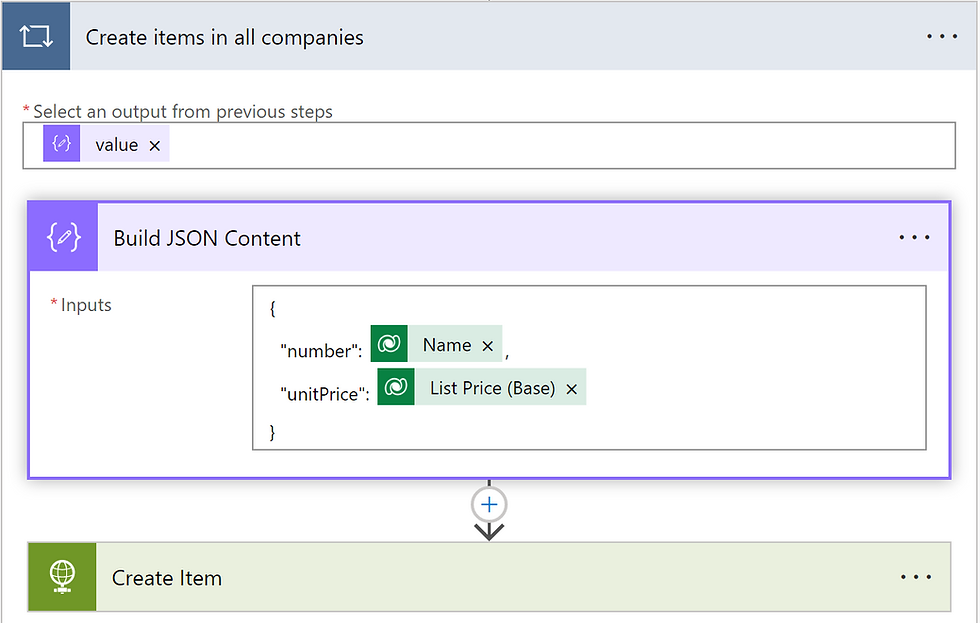
The following actions must be repeated for each company, and we can use the Apply to Each control to call an action for each item in an array. As an input for the control, we send the value array produced by the Parse JSON action.

Inside the Apply to Each block, we call an action that will create an item in each of the companies from the list. Normally, we would use the Create Record action from the Dynamics 365 Business Central action set, and it still can be used in the current scenario, but I preferred the generic HTTP Request action. First of all, I cannot select the company name from the drop-down list and must replace it with a value received from the previous Parse JSON action. Because of this, the Create Record action will not let me assign values to individual table fields in the configuration of the action. I have to send a formatted JSON object to the Create Record action.
Another reason to use the HTTP request instead of a Business Central action is the authorization token that is already received and stored. We don't need to initiate another authorization flow to execute the next action. So the following two actions triggered in a loop are a Compose data operation which builds the JSON content from the list of variables, and an HTTP Request to send the content to BC.
Building JSON content
In the Compose step, we need to define the list of fields to be sent to the Business Central API and assign respective values from the Dataverse trigger.
Creating items
Finally, the last action that concludes the flow is an HTTP request which sends the JSON structure to the BC item API endpoint. This action is repeated for every company in the list, therefore the company ID in the API URI is assigned dynamically from the flow.
Like the Get BC Companies step described above, this action must have the Authorization header specifying the token type (Bearer) and the token itself (note one whitespace between the token type and the token value). Since this is a POST request carrying JSON payload, we must add another mandatory header - Content-Type and set its value to application/json.
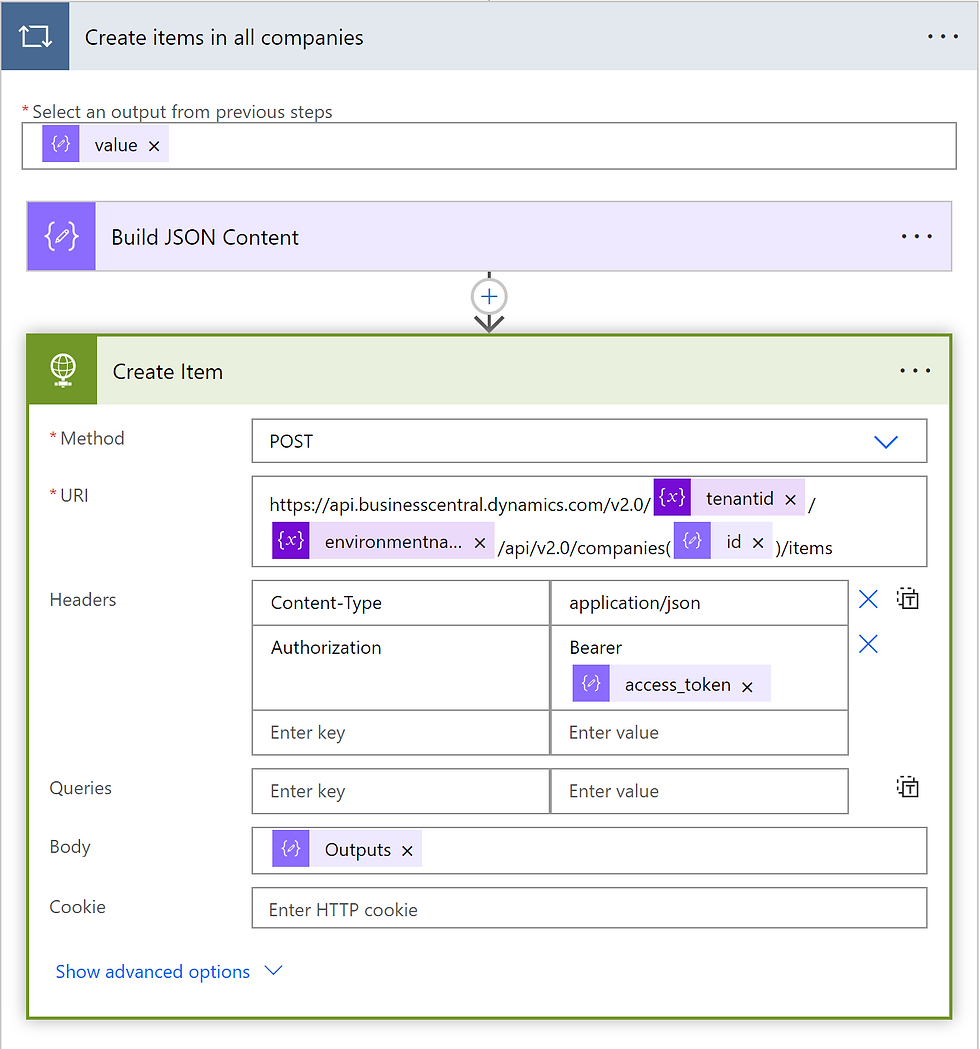
The Create Item action creates the item in each company and concludes the flow. So the outcome of my experiment demonstrated that it is possible to reduce the number of flows when the target BC database contains multiple companies. We can build a Power Automate that calls Business Central API with S2S authorization. On the hand, the exercise once again showed that Power Automate flows are rigid structures, and a step aside from the predefined configuration causes difficulties. This is a very simple example that does not care about storing the token and controlling its lifespan. Using Azure Functions for the authorization looks much more reasonable when the process becomes just slightly more complicated.
Well explained!😊